
BREWING AND FERMENTATION EQUIPMENT
Brewing & Fermentation Equipment — The Complete Guide
Fermentation is one of the oldest food preservation and transformation techniques in human history. Long before refrigeration, canning, or any modern food science, our ancestors were fermenting vegetables, grains, fruits, and dairy — not just to preserve them, but because the process created something more complex, more flavourful, and more nourishing than the raw ingredient alone. Today, home fermentation and brewing are experiencing a genuine renaissance — driven by a growing interest in gut health, artisan food production, and the deep satisfaction of making something truly alive from scratch. Here is everything you need to know about the equipment that makes it possible.
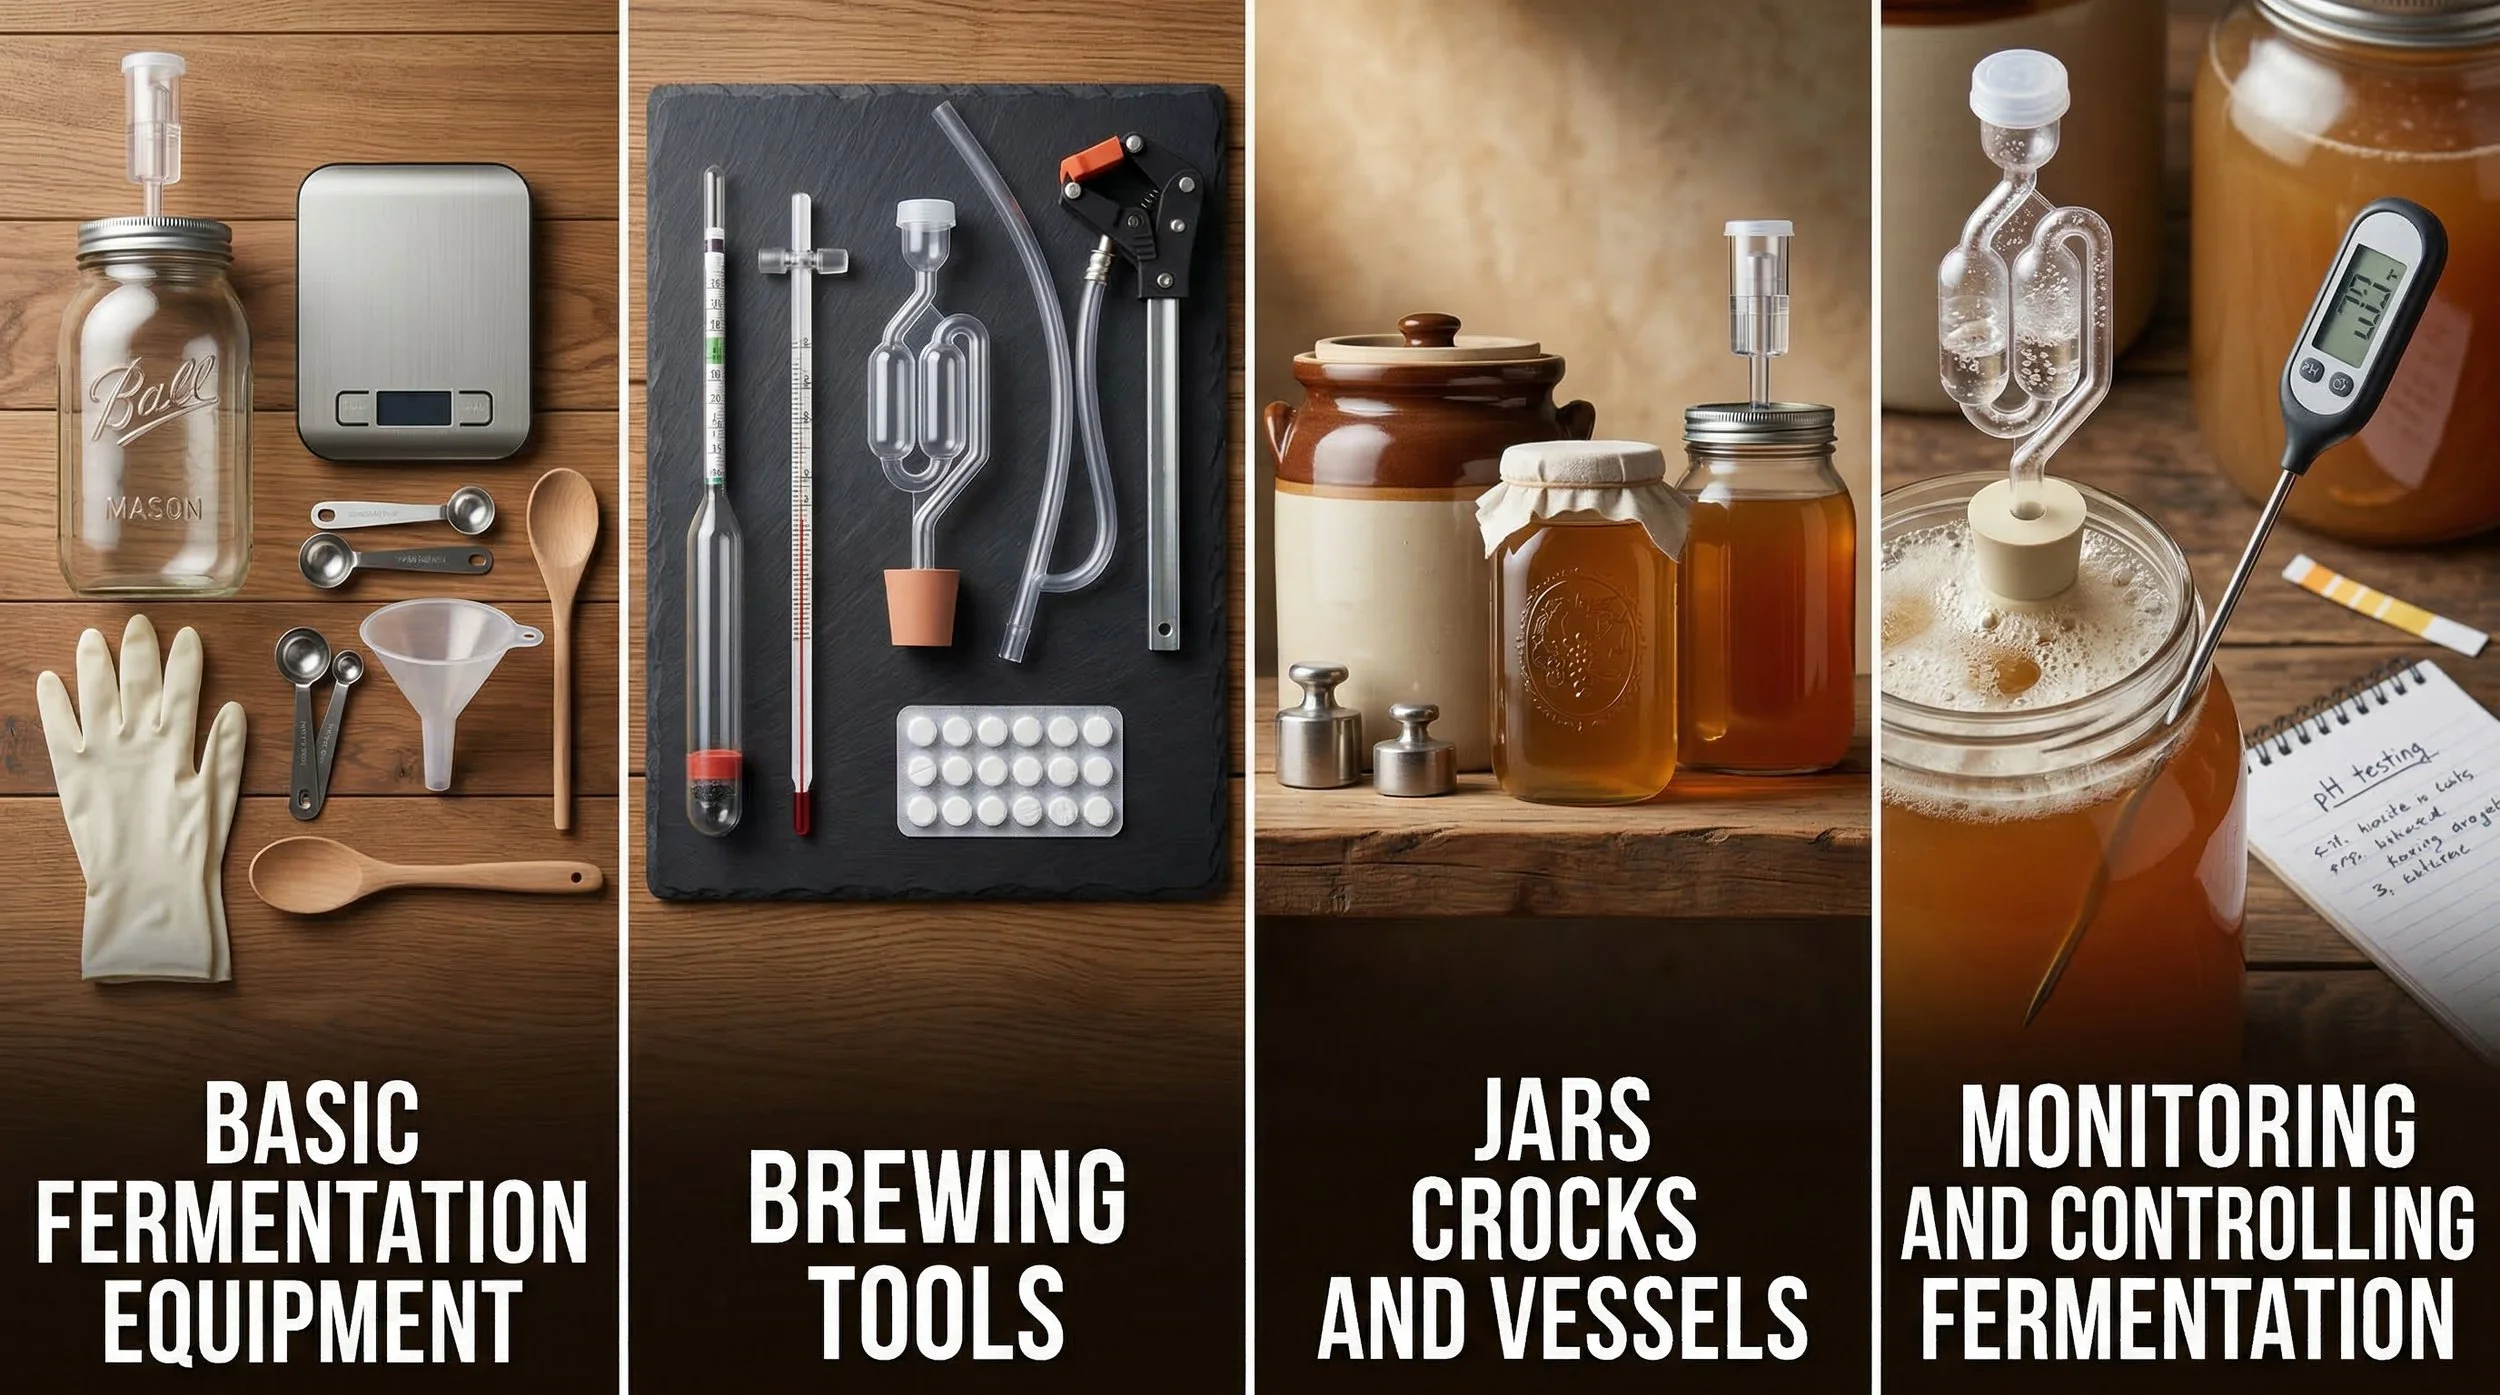
Basic Equipment for Home Fermentation
The beauty of fermentation is that it requires surprisingly little equipment to get started. The process itself is ancient and was practised for thousands of years with nothing more than a clay pot and some salt. That said, the right basic equipment makes fermentation more consistent, more reliable, and significantly more enjoyable. Here is what you need before you begin.
The Digital Kitchen Scale
Precision matters in fermentation more than in almost any other area of food preparation. The ratio of salt to vegetable in a lacto-fermentation, the ratio of sugar to water in a brine, the amount of starter culture in a sourdough — these are not approximations. They are the variables that determine whether your ferment succeeds or fails, whether it is safe to eat, and whether it tastes as it should.
A digital kitchen scale accurate to at least one gram is the single most important piece of equipment for any home fermenter. Measuring by weight rather than volume eliminates the inconsistency of packed or loosely filled measuring cups and ensures that your salt concentrations — the primary food safety variable in vegetable fermentation — are exactly where they need to be every single time.
Measuring Spoons and a Funnel
For smaller quantities of starter cultures, yeast, and spices, a set of accurate measuring spoons is essential. A wide-mouth funnel is one of those tools that seems unnecessary until the first time you try to fill a narrow-necked fermentation jar without one — and then it becomes indispensable. Choose a stainless steel funnel rather than plastic for hygiene and durability.
A Wooden Spoon or Kraut Pounder
Lacto-fermented vegetables — sauerkraut, kimchi, fermented carrots and beets — need to be packed tightly into their vessels to eliminate air pockets and submerge the vegetables below the brine. A wooden spoon handle or a dedicated kraut pounder — a heavy wooden or stainless steel pestle-like tool — is used to press and compact the vegetables firmly, releasing their natural juices and ensuring the entire contents of the jar are safely submerged beneath the liquid.
Rubber Gloves
When working with chillies, strong spices, or large quantities of raw garlic, a pair of food-safe rubber gloves protects your hands and prevents the transfer of oils and compounds that could irritate the skin. For kimchi — which involves rubbing a fiery spice paste into a large quantity of cabbage — gloves are not optional.
Sterilising Equipment
Cleanliness is the foundation of successful fermentation. Harmful bacteria, wild yeasts, and moulds competing with your intended fermentation cultures are the primary cause of failed or unsafe ferments. All equipment that comes into contact with your ferment must be thoroughly cleaned and sterilised before use.
For home fermentation, sterilising tablets — the same sodium metabisulphite or citric acid-based tablets used in home brewing — dissolved in water create an effective no-rinse sterilising solution. Star San is the professional home brewer's steriliser of choice — a food-safe, no-rinse acid sanitiser that kills pathogens effectively without leaving any residue that could inhibit fermentation. Alternatively, equipment can be sterilised in a low oven at 160°C for fifteen minutes or washed thoroughly in very hot soapy water and rinsed with boiling water.
Brewing Tools and How They Work
Home brewing — whether of beer, wine, cider, kombucha, or water kefir — requires a small set of specialist tools that monitor and manage the fermentation process. Each one plays a specific role in ensuring a successful, consistent, and safe result.
The Hydrometer
The hydrometer is the brewer's most important measuring instrument. It is a weighted glass tube that floats in liquid — the depth to which it sinks indicates the density of the liquid relative to water, expressed as a specific gravity reading.
In brewing, the hydrometer is used to measure the sugar content of a liquid before and after fermentation. Before fermentation begins — at what is called the original gravity — the liquid is dense with dissolved sugars. As yeast consumes those sugars and converts them to alcohol and carbon dioxide, the density of the liquid decreases. When the final gravity reading stabilises over two consecutive days, fermentation is complete. By comparing the original gravity to the final gravity using a simple formula, the brewer can calculate the alcohol by volume of the finished drink with reasonable accuracy.
The hydrometer is also an essential safety tool. Bottling a beer or cider before fermentation is truly complete traps carbon dioxide in the bottle, which continues to build pressure — potentially to the point of explosion. A stable final gravity reading confirms that fermentation has genuinely finished and the drink is safe to bottle.
The Thermometer
Temperature is one of the two most critical variables in fermentation — the other being oxygen management. Different fermentation cultures thrive at different temperatures, and controlling the temperature of your ferment is one of the most direct ways to influence the speed, character, and outcome of the process.
Ale yeasts ferment optimally between 18°C and 22°C — too warm and they produce off-flavours; too cold and fermentation slows or stalls. Lager yeasts work at much lower temperatures — between 8°C and 12°C — which is why lager fermentation traditionally takes place in cold caves or cellars. Sourdough starter is most active at around 24°C to 28°C. Kombucha cultures prefer 24°C to 29°C.
A digital thermometer with a probe — or a stick-on fermometer strip that adheres to the outside of the fermentation vessel — allows you to monitor temperature accurately and consistently throughout the process.
The Airlock and Bung
The airlock is one of the most elegantly simple pieces of fermentation equipment ever designed. It fits into the neck of a fermentation vessel via a rubber bung and contains a small amount of water or sanitising solution. Carbon dioxide produced by the fermentation process bubbles up through the water and escapes — but air and contaminants cannot travel in the other direction. The airlock creates a one-way valve that protects the ferment from oxidation and contamination while allowing it to breathe.
There are two main types of airlock — the S-shaped or double bubble airlock, which is the most common and easiest to clean, and the three-piece airlock, which disassembles fully for thorough cleaning. Both work on the same principle and both are equally effective.
The reassuring, rhythmic bubbling of an active airlock is one of the most satisfying sights in home brewing — visual confirmation that fermentation is alive and working.
The Siphon and Auto-Siphon
Transferring fermented liquid from one vessel to another — a process called racking — is one of the most important steps in home brewing. Racking removes the finished liquid from the layer of dead yeast cells and sediment — called the lees or trub — that accumulates at the bottom of the fermentation vessel. Leaving a brew on its lees for too long can introduce off-flavours as the dead yeast cells begin to break down.
A siphon tube transfers liquid by gravity and suction — once started, the liquid flows continuously until the vessel is empty. An auto-siphon adds a simple pump mechanism that starts the siphon with a single stroke, eliminating the need to start the flow by mouth — which would introduce bacteria and wild yeast into a carefully sanitised environment.
The Bottle Capper and Bottles
For home-brewed beer and sparkling cider, a bottle capper is the tool that seals crown-cap bottles — the standard beer bottle cap — with a firm press. A bench capper is more stable and easier to use than a handheld wing capper, particularly when sealing large quantities of bottles. Always use new crown caps rather than reused ones — the seal on a used cap may be compromised, leading to flat beer or oxidation.
The pH Meter and Testing Strips
The acidity of a ferment — measured as pH — is a key indicator of both safety and progress. In lacto-fermentation, the production of lactic acid reduces the pH of the ferment, creating the acidic environment that both preserves the food and gives it its characteristic sour flavour. A pH below 4.6 is considered safe from botulism and most harmful bacteria. Sourdough starter health, kombucha progress, and water kefir activity can all be monitored with pH measurement.
pH testing strips are inexpensive and give a reasonable approximation of acidity — sufficient for most home fermenters. A digital pH meter gives a more precise reading and is worth the investment for serious fermenters who want accurate, reproducible results.
Jars, Crocks, and Fermentation Vessels
The vessel in which you ferment is more than just a container — it determines how much oxygen your ferment is exposed to, how easy it is to monitor and manage the process, how much you can ferment at once, and how well the finished product keeps. Here is a guide to the main fermentation vessels and what each one is best used for.
Glass Mason Jars
The wide-mouth glass mason jar is the starting point for most home fermenters and remains one of the best all-round fermentation vessels available at any level. Glass is completely non-reactive — it will never leach flavours, chemicals, or odours into your ferment regardless of how acidic or pungent the contents become. It is transparent, allowing you to monitor the progress of your ferment at a glance. It is easy to sterilise thoroughly. And it is inexpensive and available everywhere.
Wide-mouth mason jars — in one-litre and two-litre sizes — are ideal for small-batch sauerkraut, kimchi, fermented vegetables, kombucha, and water kefir. The standard two-piece lid can be replaced with a specialised airlock lid — a simple, inexpensive accessory that converts any mason jar into a proper anaerobic fermentation vessel — or a cloth cover secured with a rubber band for ferments that benefit from some air exposure, such as vinegar and some kombucha preparations.
Chef's insight: Always leave at least five centimetres of headspace in a mason jar during active fermentation — the contents will expand and bubble as carbon dioxide is produced, and an overfilled jar will push liquid up into the airlock or overflow the lid.
Stoneware Crocks
The traditional stoneware fermentation crock is the vessel that humans have used for fermentation for thousands of years — and it remains one of the finest options available today. Heavy, beautiful, and built to last indefinitely, a good stoneware crock is a lifetime investment in your fermentation practice.
Traditional crocks come in two styles. The open crock is a simple, wide-mouthed vessel used with a plate and weights to keep vegetables submerged — the simplest and oldest fermentation setup in existence. The water-seal crock — also called a gärtopf in German — features a moat around the rim of the vessel that is filled with water, into which the lid sits. This creates an automatic water seal that allows carbon dioxide to escape while preventing air from entering — a beautifully engineered passive airlock system built directly into the vessel design.
Stoneware crocks are ideal for large-batch fermentation — sauerkraut, kimchi, fermented pickles, and preserved vegetables in quantities that would require dozens of mason jars. Their thick walls provide excellent thermal insulation, moderating temperature fluctuations that could affect fermentation. The only limitations are weight — a large crock full of fermenting vegetables is very heavy — and the inability to see the contents without opening the vessel.
Glass Fermentation Jars with Airlock Lids
Wide-mouth glass fermentation jars — typically between one and five litres — with purpose-built airlock lids represent the modern evolution of the mason jar setup. These vessels are designed specifically for fermentation, with a wide mouth that makes packing and cleaning easy, a glass body that allows full visibility of the ferment, and a lid with a built-in airlock that creates a reliable anaerobic environment without any additional equipment.
They are an excellent choice for intermediate home fermenters who have outgrown mason jars but don't yet need the capacity of a full stoneware crock. The combination of transparency, airlock protection, and ease of cleaning makes them one of the most practical and user-friendly fermentation vessels available.
Demijohns and Carboys
For home brewing of beer, wine, cider, and mead, the demijohn or carboy is the standard fermentation vessel. A demijohn is a glass vessel — typically four to twenty-five litres — with a narrow neck designed to accept a rubber bung and airlock. A carboy is its larger plastic equivalent, typically used for five-gallon and larger batches of beer or wine.
The narrow neck of the demijohn minimises the surface area of the liquid exposed to air, reducing the risk of oxidation during secondary fermentation. Glass demijohns are preferred for long fermentations and wines — they are completely non-reactive and do not allow any oxygen to pass through the vessel walls. Plastic carboys are lighter and less fragile but are not entirely oxygen-impermeable and should not be used for fermentations lasting more than a few months.
Ceramic and Clay Vessels
Beyond stoneware crocks, a wide range of ceramic and clay vessels are used in traditional fermentation cultures around the world. Korean onggi pots — large, porous earthenware vessels — are the traditional home of kimchi and doenjang fermentation in Korea. The micro-porosity of the unglazed clay allows a tiny exchange of gases and moisture that is said to contribute to the distinctive character of traditionally fermented Korean ingredients.
Japanese pickle crocks, Chinese fermentation jars, and Indian clay pots all represent centuries of accumulated wisdom about how vessel material, shape, and porosity interact with the fermentation process. Exploring traditional vessels is one of the most enriching rabbit holes in home fermentation.
Monitoring and Controlling the Fermentation Process
Understanding and managing the variables that influence fermentation is what separates a consistent, confident fermenter from someone who produces good results occasionally and wonders why things go wrong the rest of the time. Here is a detailed guide to the key variables and how to control them.
Temperature Management
Temperature is the single most influential variable in fermentation. It determines the speed of fermentation, the balance of microbial activity, the flavour profile of the finished product, and the safety of the process.
Too warm and fermentation accelerates — which sounds desirable but often produces off-flavours as yeast and bacteria work faster than is ideal, producing undesirable by-products alongside the flavours you want. In lacto-fermentation, warm temperatures encourage the growth of a broader range of bacteria, some of which produce mushy textures and unpleasant flavours. In beer brewing, warm fermentation drives yeast to produce excessive esters and fusel alcohols that give an unpleasantly harsh, solvent-like character to the finished beer.
Too cold and fermentation slows dramatically or stalls entirely. Yeast becomes dormant below around 10°C for most ale strains. Lacto-fermentation slows to a crawl in cold conditions — which is actually desirable for long, slow ferments like traditional sauerkraut, where a slow fermentation at cool room temperature produces a more complex, nuanced flavour than a fast warm fermentation.
Practical temperature control at home: The simplest approach is to find the naturally coolest or warmest spots in your home and use them deliberately. A kitchen cupboard near a heat source may sit at a consistent 22°C — ideal for ale fermentation. A garage or basement in winter may hold at 10°C — perfect for lager fermentation or slow vegetable ferments. A dedicated fermentation chamber — a small refrigerator or wine cooler fitted with a temperature controller — gives precise, year-round control and is the serious home brewer's solution.
Oxygen Management
Oxygen is the enemy of most fermentation — with the notable exception of the initial aerobic phase of some fermentations and vinegar production, where oxygen is essential. For the vast majority of ferments, excluding oxygen is one of the primary goals.
In lacto-fermentation of vegetables, keeping the vegetables submerged below the brine eliminates the oxygen that would otherwise allow moulds and harmful bacteria to establish on the surface. Fermentation weights — small glass or ceramic discs sized to fit inside mason jars — hold vegetables firmly below the brine surface throughout the fermentation period.
In brewing, the airlock creates the oxygen barrier that protects the fermenting liquid from oxidation and contamination. Keeping the fermentation vessel full to minimise headspace, avoiding unnecessary racking, and ensuring all equipment is properly sanitised all contribute to effective oxygen management.
Kahm yeast — a flat, white, powdery film that sometimes forms on the surface of vegetable ferments — is a harmless but undesirable wild yeast that establishes when vegetables are not fully submerged. It is not dangerous and the ferment beneath it is almost always still good, but it can impart off-flavours. Remove it carefully with a clean spoon and ensure your vegetables are properly weighted down to prevent recurrence.
Brine Concentration
In lacto-fermentation of vegetables, the concentration of salt in the brine is the primary food safety variable. Salt creates a selective environment that favours the lactic acid bacteria naturally present on vegetables — primarily Lactobacillus species — while suppressing the growth of harmful pathogens.
A brine concentration of 2% to 3% by weight — 20 to 30 grams of salt per kilogram of vegetables — is the standard range for most lacto-fermented vegetables. Below 1.5% the ferment may be vulnerable to harmful bacterial growth. Above 3.5% the ferment may be too salty and the lactic acid bacteria may be inhibited along with the pathogens.
Always use non-iodised salt for fermentation — iodine is added to table salt as a supplement and it inhibits the lactic acid bacteria that drive lacto-fermentation. Sea salt, kosher salt, and pickling salt are all appropriate choices.
Monitoring Fermentation Progress
Knowing what to look for — and what to be concerned about — is the knowledge that gives a home fermenter confidence. Here is what to expect at each stage.
In the first 24 to 48 hours of a vegetable ferment, you may see small bubbles forming in the brine and the vegetables beginning to change colour slightly. This is the initial stage of fermentation — the lactic acid bacteria are establishing themselves and beginning to produce carbon dioxide and lactic acid.
Between days two and seven, fermentation is typically at its most active — vigorous bubbling, a pleasantly sour smell developing, and a noticeable drop in pH. This is the most critical period for monitoring temperature and ensuring vegetables remain submerged.
After the first week, fermentation slows as the pH drops and the environment becomes increasingly acidic — which is exactly as intended. The flavour develops in complexity and depth. Taste your ferment regularly from this point — the decision of when to stop fermenting and move to cold storage is ultimately a matter of personal taste.
In brewing, the airlock activity tells the story — vigorous bubbling in the first two to four days signals active fermentation, which then slows to occasional bubbles over the following days before stopping entirely when fermentation is complete. Never rely on airlock activity alone to confirm completion — always confirm with a stable hydrometer reading over two consecutive days.
Record Keeping
The home fermenter who keeps notes learns faster, produces more consistent results, and can replicate successes and diagnose failures with confidence. A simple notebook recording the date, ingredients and quantities, original gravity for brewing, fermentation temperature, and tasting notes at regular intervals is all that is needed. Over time, this record becomes an invaluable personal reference — a library of your own fermentation experience that no book or recipe can replicate.
Fermentation is patience made delicious. It asks very little of you — good ingredients, clean equipment, the right conditions, and the willingness to let time do most of the work. In return it gives you food and drink of extraordinary complexity, depth, and vitality. Start simply, pay attention, take notes, and let the process teach you. It has been teaching people for ten thousand years.