
KNIVES & CUTTING TOOLS
Types of Kitchen Knives and What They're Used For
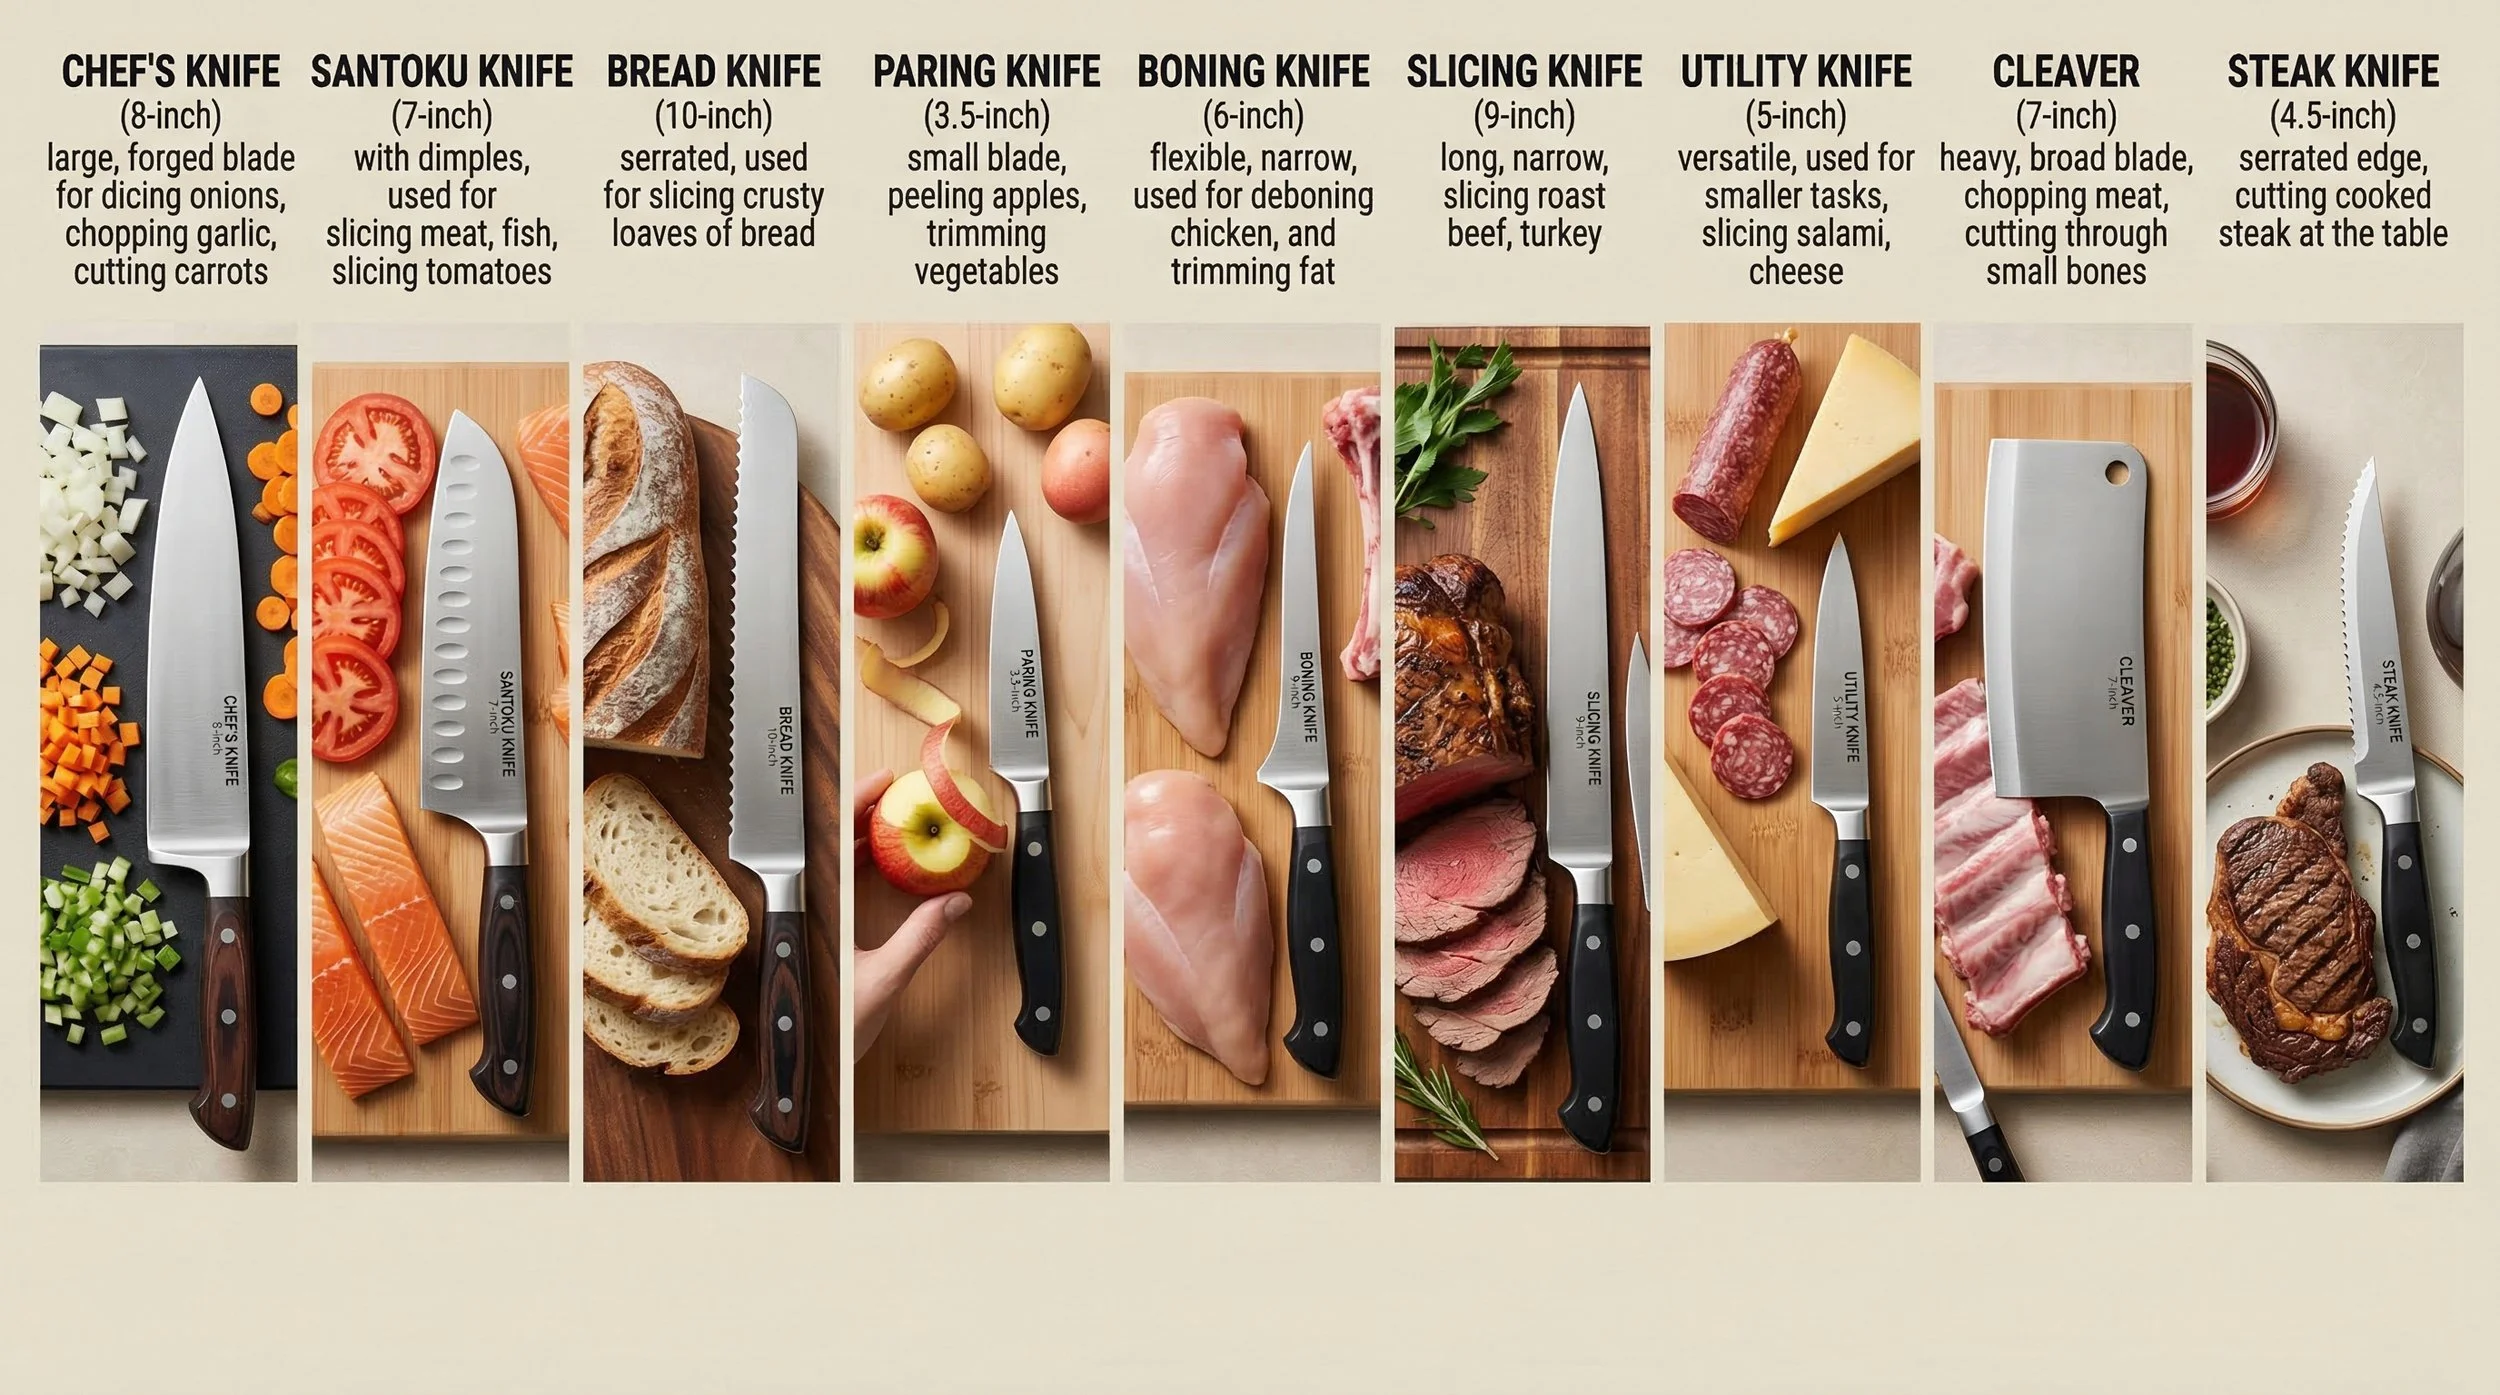
A good knife is the most important tool in any kitchen. Whether you're a home cook or a professional chef, understanding which knife to use and when can transform the way you cook — making prep faster, safer, and more enjoyable. Here's a complete guide to the essential kitchen knives and what they're best used for.
The Chef 's Knife
The chef's knife is the workhorse of the kitchen and the single most important knife you'll ever own. Typically between 8 and 10 inches long, it features a broad, tapered blade that curves upward to a point, allowing for a rocking motion when chopping. It handles almost everything — dicing onions, mincing garlic, chopping vegetables, slicing meat, and breaking down herbs. If you're only going to invest in one knife, make it this one. A well-made chef's knife, kept sharp, will serve you for a lifetime.
The Santoku Knife
The Santoku is the Japanese answer to the chef's knife. Shorter and lighter, usually around 5 to 7 inches, it features a flatter blade with a distinctive sheep's foot tip. The word "Santoku" roughly translates to "three virtues" — slicing, dicing, and mincing. Many Santoku knives feature small oval indentations along the blade called granton edges, which prevent food from sticking as you cut. It's an excellent choice for slicing fish, meat, and vegetables with precision and is particularly popular with cooks who prefer a lighter knife.
The Bread Knife
The bread knife is instantly recognisable by its long, serrated edge — typically around 8 to 10 inches. That serrated blade is designed to saw through crusty bread without crushing the soft interior. But its uses go beyond bread — it's also excellent for slicing tomatoes, cakes, and other foods with a soft interior and tougher exterior. A bread knife should never need sharpening in the traditional sense, as the serrated edge maintains its effectiveness for years.
The Paring Knife
Small but mighty, the paring knife is typically 3 to 4 inches long and is designed for delicate, precise work that a larger knife simply can't manage. Peeling fruit and vegetables, trimming, deveining prawns, segmenting citrus, and scoring — these are all jobs for the paring knife. It's the knife you reach for when you need total control with minimal effort. Every kitchen needs one.
The Boning Knife
The boning knife has a narrow, flexible blade — usually 5 to 6 inches — specifically designed to separate meat from bone. Its flexibility allows it to navigate around joints, follow the curves of bones, and remove skin and sinew cleanly. It's indispensable when butchering chicken, deboning a leg of lamb, or trimming a rack of ribs. A stiffer boning knife is better for beef and pork, while a more flexible one works best for poultry and fish.
The Slicing Knife
Also called a carving knife, the slicing knife features a long, narrow blade — usually 9 to 12 inches — with a fine, sharp edge designed to cut thin, even slices of cooked meat. It's the knife you want for carving a Sunday roast, slicing turkey at the table, or cutting through a whole salmon. The length of the blade allows you to slice in long, smooth strokes rather than sawing, which preserves the texture and presentation of the meat.
The Utility Knife
Sitting between the chef's knife and the paring knife in size — usually around 4 to 6 inches — the utility knife is the versatile middle ground. It handles tasks that are too big for a paring knife but don't quite need the power of a full chef's knife. Slicing cheese, cutting sandwiches, trimming vegetables, and slicing salami are all well within its range. It's a practical, underrated knife that earns its place in any kitchen.
The Cleaver
The cleaver is the heaviest and most imposing knife in the kitchen. With its thick, rectangular blade, it's designed for one thing above all — power. It can chop through bone, split whole chickens, crack open lobster shells, and handle large cuts of meat that would damage a standard knife. Chinese cleavers, which are slightly lighter and thinner, are also used for vegetable prep and general slicing in Asian cooking. A cleaver is a specialist tool, but when you need it, nothing else will do.
The Steak Knife
Unlike the other knives on this list, the steak knife is a table knife rather than a kitchen prep knife. Usually around 4 to 5 inches with a serrated or straight sharp edge, it's designed to cut through cooked steak cleanly at the table. A sharp steak knife makes the dining experience noticeably better — tearing at meat with a blunt knife is never a pleasant experience. Good steak knives are an investment worth making if you regularly cook and serve meat.
A Few Tips on Knife Care
Keeping your knives in good condition is just as important as choosing the right one. Always hand wash your knives rather than putting them in the dishwasher — the heat and detergent will damage the blade and handle over time. Store them on a magnetic strip or in a knife block, never loose in a drawer where the blades can knock against each other. Sharpen regularly with a whetstone or honing steel, and have them professionally sharpened once or twice a year if needed.
A sharp knife is always safer than a blunt one — it requires less force, gives you more control, and makes cooking a far more enjoyable experience.
The right knife for the right job isn't just about efficiency — it's about respecting the craft of cooking and getting the best possible results on the plate.
How to Sharpen and Maintain Your Knives
A sharp knife is one of the most important tools in the kitchen — and one of the most neglected. Many home cooks use blunt knives for years without realising how much harder they're making their lives. A blunt knife requires more force, gives you less control, and is actually more dangerous than a sharp one. Here's everything you need to know to keep your knives in peak condition.
Understanding the Difference Between Honing and Sharpening
These two terms are often confused, but they mean very different things.
Honing realigns the edge of the blade. Over time and with regular use, the fine edge of a knife blade bends and rolls slightly out of alignment — it doesn't disappear, it just moves. A honing steel straightens it back into place. Honing doesn't remove metal; it simply corrects the blade's edge. You should hone your knives regularly — ideally every time you use them.
Sharpening actually removes a small amount of metal from the blade to create a new, sharp edge. This is done when honing is no longer enough to restore the knife's performance. Depending on how often you cook, most knives need sharpening a few times a year at most.
How to Use a Honing Steel
A honing steel is the long, rod-shaped tool that comes with most knife sets. Here's how to use it correctly:
Hold the steel vertically, tip pointing down onto a chopping board or folded cloth. Place the heel of the knife blade at the top of the steel at roughly a 15 to 20 degree angle. Draw the blade downward and toward you in a smooth, sweeping arc, moving from heel to tip. Repeat on the other side of the blade. Six to eight strokes per side is usually enough. Do this before each cooking session and your knife will stay sharp and responsive for much longer between proper sharpenings.
How to Sharpen with a Whetstone
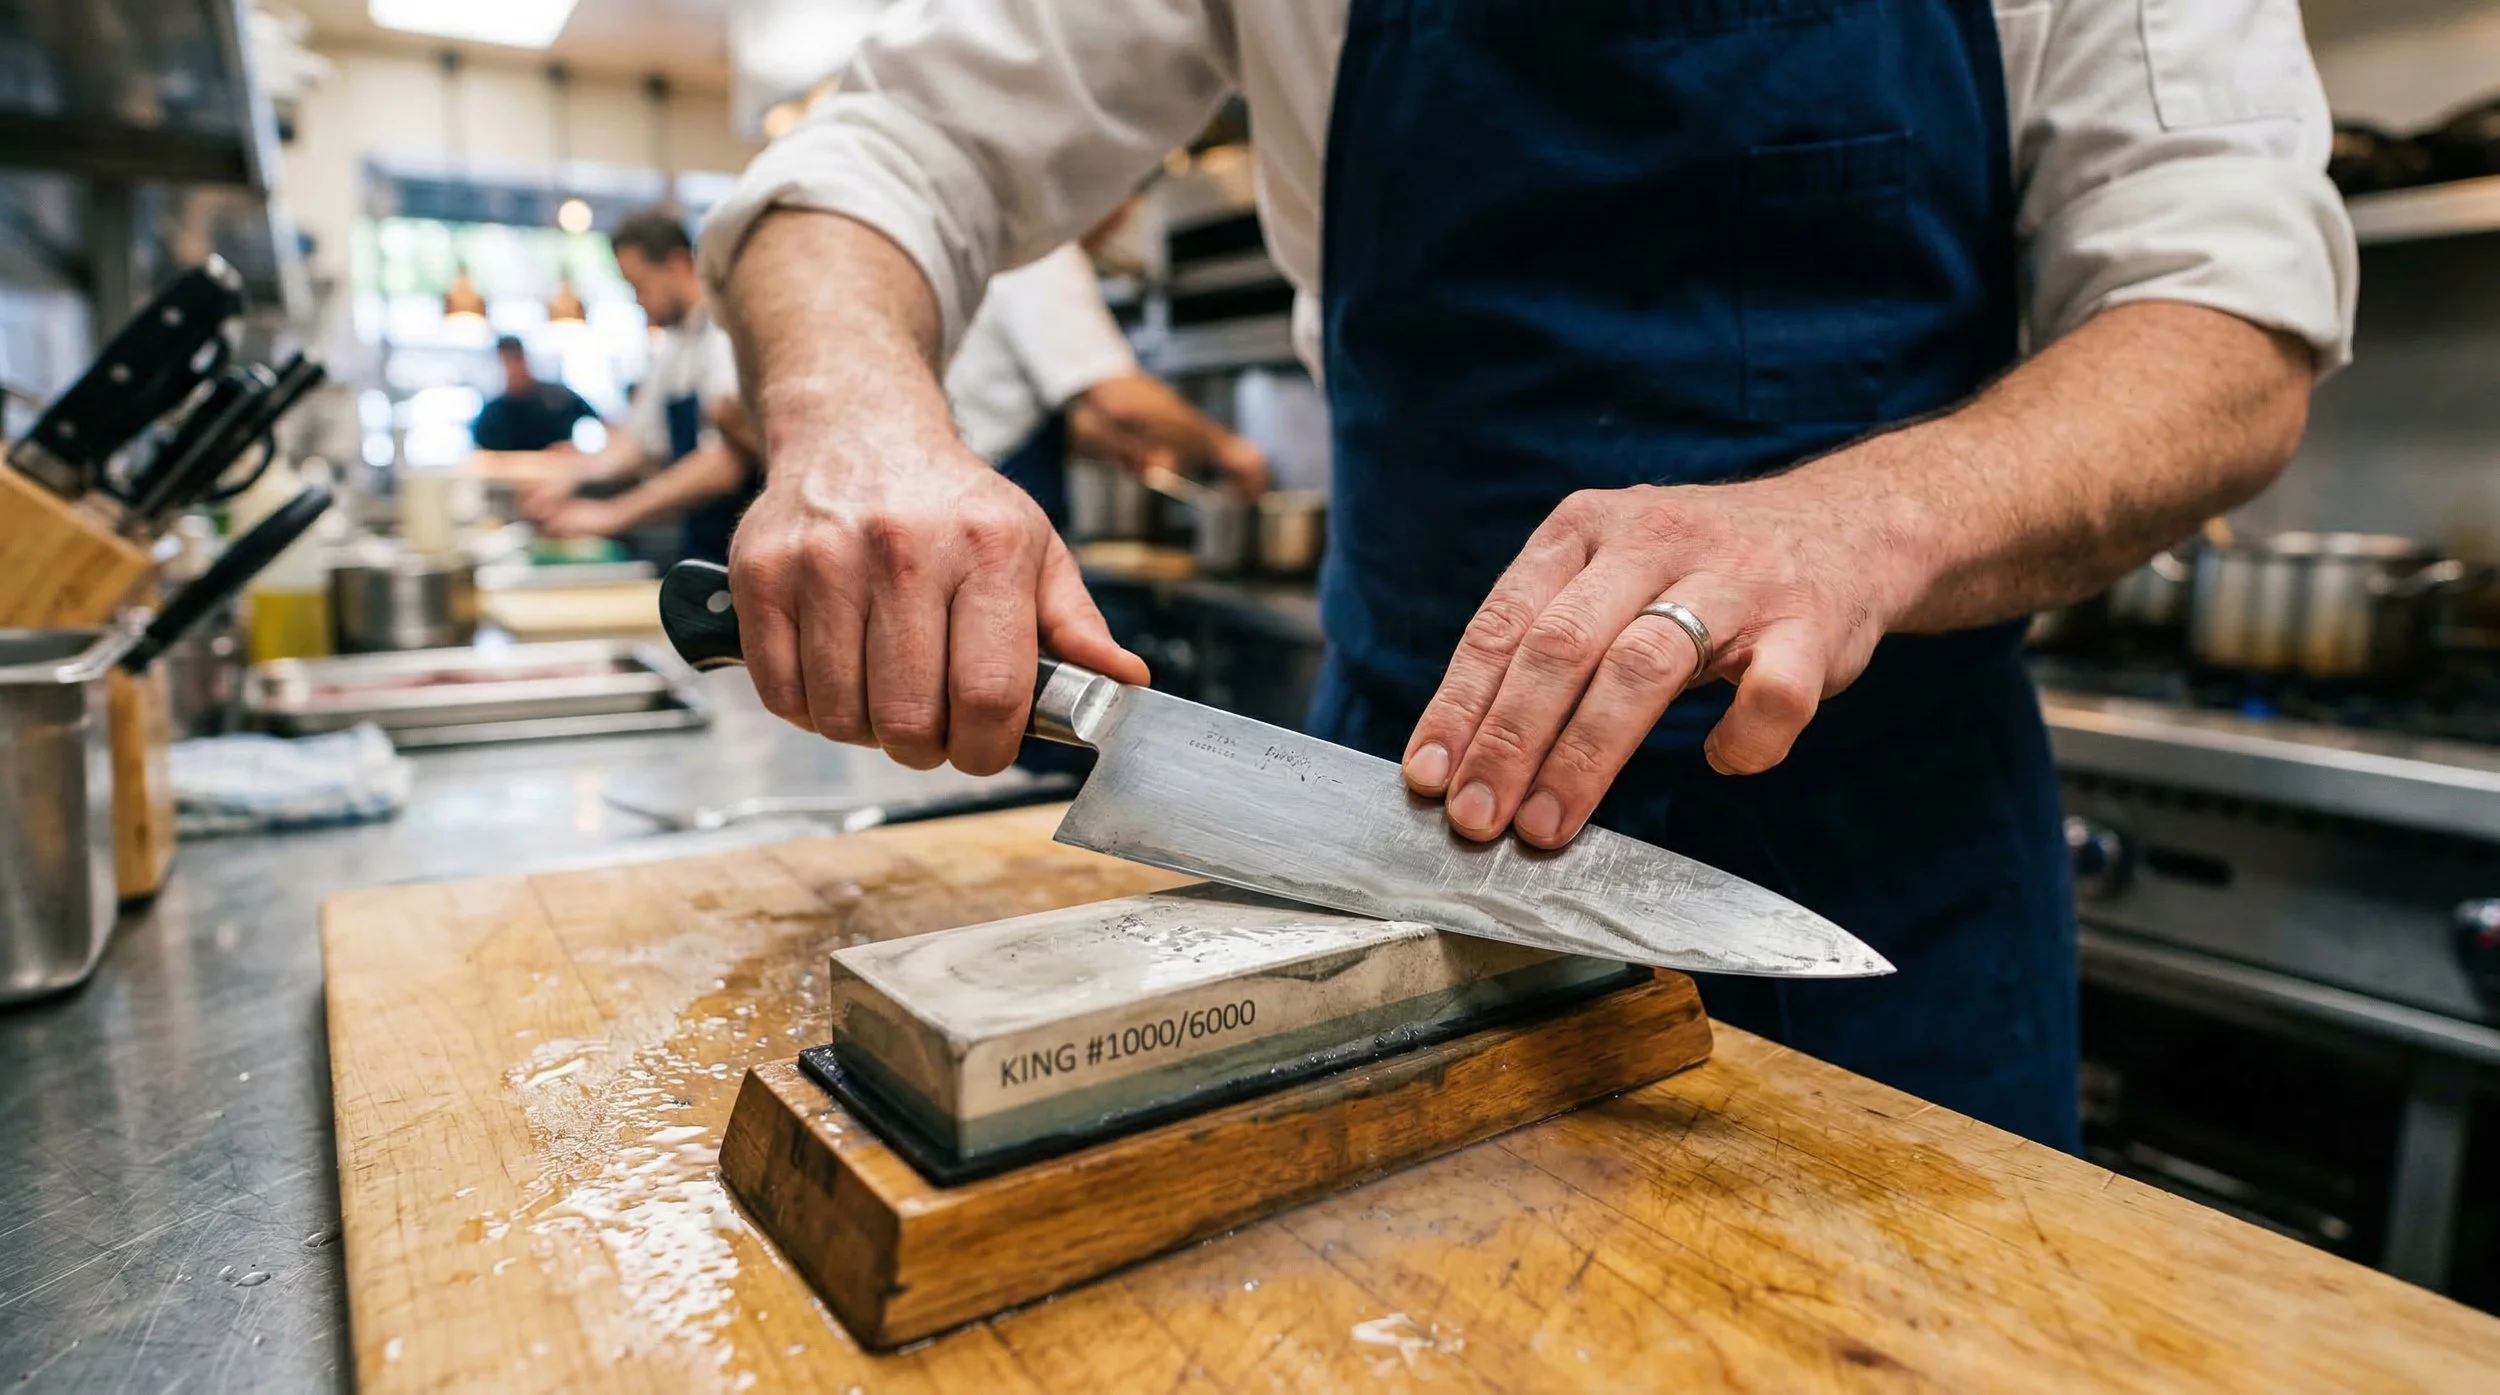
A whetstone — also called a sharpening stone — is the most effective and precise way to sharpen a knife at home. It takes a little practice but produces outstanding results.
Soak the stone in water for 10 minutes before use. Place it on a damp cloth to stop it sliding. Hold the knife at a consistent 15 to 20 degree angle against the stone — for European knives this is usually around 20 degrees, for Japanese knives closer to 15. Push the blade forward across the stone from heel to tip, as if you're trying to slice a thin layer off the surface. Apply light, consistent pressure. Repeat this motion 8 to 10 times on one side, then switch and repeat on the other. Finish on the finer grit side of the stone to polish and refine the edge, then rinse the blade and dry immediately.
Whetstones come in different grits — a lower number like 200 to 400 is coarser and used for repairing damaged or very blunt blades, while higher numbers like 1000 to 3000 are for regular sharpening, and 6000 and above are for polishing and finishing.
Electric and Pull-Through Sharpeners
Electric sharpeners and pull-through sharpeners are quick and easy to use, making them popular with home cooks. They remove more metal than necessary and can shorten the life of your knife over time, but for everyday use they are a perfectly practical solution. If you're not confident using a whetstone, a good quality electric sharpener will keep your knives in decent working condition. Always follow the manufacturer's instructions and use light pressure — let the sharpener do the work.
Professional Sharpening
Even if you hone and sharpen your knives regularly at home, it's worth having them professionally sharpened once or twice a year. A professional sharpener has the tools and expertise to restore the blade to its original geometry and deal with any chips or damage that home sharpening can't fix. Many kitchen shops, butchers, and farmers markets offer this service at a very reasonable cost.
Everyday Knife Care and Maintenance
How you treat your knives day to day has a huge impact on how long they stay sharp and in good condition.
Always hand wash your knives. The dishwasher is the enemy of good knives. The heat, moisture, and harsh detergents will dull the blade, damage the handle, and cause the metal to corrode over time. Wash by hand with warm soapy water, rinse, and dry immediately.
Never leave knives soaking in water. Even brief soaking can damage wooden handles and cause the blade to rust or stain, particularly with carbon steel knives.
Use the right chopping board. Wood and plastic boards are kind to knife edges. Glass, ceramic, marble, and metal boards will destroy the edge of even the finest knife very quickly. Always use a wooden or plastic board.
Store knives properly. Loose in a drawer is the worst thing you can do — blades knock against each other, dulling the edge and creating a safety hazard. Use a magnetic wall strip, a knife block, or individual blade guards to protect both the knife and your fingers.
Never scrape food with the blade edge. After chopping, many cooks scrape the food across the board using the knife blade. Always turn the knife so the spine — the blunt back edge — is doing the scraping, not the sharp edge. It's a small habit that makes a big difference over time.
How to Tell When Your Knife Needs Sharpening
The simplest test is the paper test — hold a sheet of standard printer paper and slice downward through it. A sharp knife will cut cleanly and smoothly. A blunt one will tear, snag, or simply push through. Another test is the tomato test — a sharp knife will glide through the skin of a tomato with no pressure at all. If you find yourself pressing down or sawing, it's time to sharpen.
Caring for your knives is caring for your cooking. A few minutes of maintenance every week will keep your blades performing beautifully for years — and make every moment in the kitchen safer, easier, and more enjoyable.

Cutting Boards — Materials and Best Practices
A cutting board is one of those kitchen tools that rarely gets the attention it deserves. Yet it's on the board that all the real prep work happens — and choosing the right material and looking after it properly can make a genuine difference to your cooking, your knives, and your food safety.
Wood Cutting Boards
Wood is the classic choice and for good reason. A well-made wooden cutting board — typically made from maple, walnut, or cherry — is gentle on knife edges, naturally beautiful, and incredibly durable when looked after properly. Wood has a natural ability to close around small cuts in its surface, which helps prevent bacteria from thriving deep in the grooves.
Hardwoods like maple and walnut are the gold standard. They're dense enough to resist deep scoring but not so hard that they damage your blades. End-grain boards — where the wood fibres run vertically — are particularly prized, as knives slip between the fibres rather than cutting across them, making them the kindest surface for your blades and the most self-healing over time.
Best for: Everyday chopping, vegetables, fruit, bread, meat, and fish.
Care: Hand wash only — never put a wooden board in the dishwasher. Dry immediately after washing, store upright, and oil regularly with food-grade mineral oil or beeswax to prevent cracking and warping.
Bamboo Cutting Boards
Bamboo is technically a grass rather than a wood, and it's one of the most sustainable materials available. It's harder and denser than most woods, which makes it very durable and resistant to scratching. However, that hardness is also its main drawback — bamboo is tougher on knife edges than softer wood boards, and it can cause blades to dull faster with regular use.
Bamboo boards are lightweight, affordable, and widely available, making them a popular choice for everyday home kitchens.
Best for: Light chopping, vegetables, fruit, and bread.
Care: Hand wash only, dry immediately, and oil occasionally to prevent splitting. Avoid soaking in water.
Plastic Cutting Boards
Plastic boards are the most common choice in professional and commercial kitchens, primarily because they are dishwasher safe and easy to sanitise. They're lightweight, inexpensive, and come in a range of colours — which brings us to one of their greatest advantages.
Colour coding plastic boards by food type is a widely used system in professional kitchens to prevent cross-contamination. A common system looks like this:
Red — raw meat
Yellow — raw poultry
Blue — raw fish
Green — fruit and vegetables
White — dairy and bread
Brown — cooked meat
Purple - "free-from" or allergen-free foods
The downside of plastic is that over time, knife cuts create deep grooves in the surface where bacteria can harbour and become very difficult to remove, even with dishwasher cleaning. When a plastic board becomes heavily scored, it should be replaced.
Best for: Raw meat, poultry, and fish — anywhere hygiene and easy sanitisation are the priority.
Care: Dishwasher safe. Replace when the surface becomes heavily grooved.
Glass and Ceramic Cutting Boards
Glass and ceramic boards look sleek and are completely non-porous, making them highly hygienic and easy to clean. However, they are without doubt the worst surface for your knives. The extreme hardness of glass and ceramic will dull and damage knife edges very quickly, and they offer very little grip for safe cutting.
They are best used as serving boards or trivets rather than actual cutting surfaces.
Best for: Serving cheese, charcuterie, or bread — not for actual knife work.
Care: Dishwasher safe, easy to clean, but handle with care as they can crack or shatter if dropped.
Marble and Stone Cutting Boards
Like glass, marble and stone boards are beautiful, non-porous, and very easy to clean. They are also extremely hard on knives and should not be used for regular chopping. Marble boards are particularly popular for pastry work, as the cool surface is ideal for rolling out dough and working with chocolate.
Best for: Pastry, chocolate work, and serving.
Care: Wipe clean, avoid acidic foods which can stain or etch the surface over time.
Best Practices for All Cutting Boards
Use separate boards for raw meat and everything else. This is the single most important food safety habit in the kitchen. Raw meat, poultry, and fish should always be prepared on a dedicated board, kept well away from vegetables, fruit, and cooked foods.
Keep your board stable. A board that slides around is dangerous. Place a damp cloth or non-slip mat underneath to keep it firmly in place while you work.
Size matters. A cutting board should always be larger than you think you need. Working on a cramped board leads to accidents and inefficient prep. Give yourself room to move.
Replace when necessary. No cutting board lasts forever. Deep grooves on any board — wood or plastic — are a sign that it's time for a replacement.
Don't cut directly on a wet board. A wet surface causes food to slide and makes clean, precise cuts much harder and more dangerous.
Sanitise regularly. For a natural sanitiser, rub your wooden board with coarse salt and half a lemon — it deodorises and cleans the surface effectively without damaging the wood.
The Bottom Line
For most home kitchens, the ideal setup is two boards — a large wooden or end-grain board for everyday vegetable and bread prep, and a dedicated plastic board for raw meat, poultry, and fish. This simple combination covers all the bases, keeps your knives sharp, and keeps your kitchen safe.
Treat your cutting board well and it will serve you for years. It is, after all, where every great meal begins.
Mandolines, Peelers and Graters
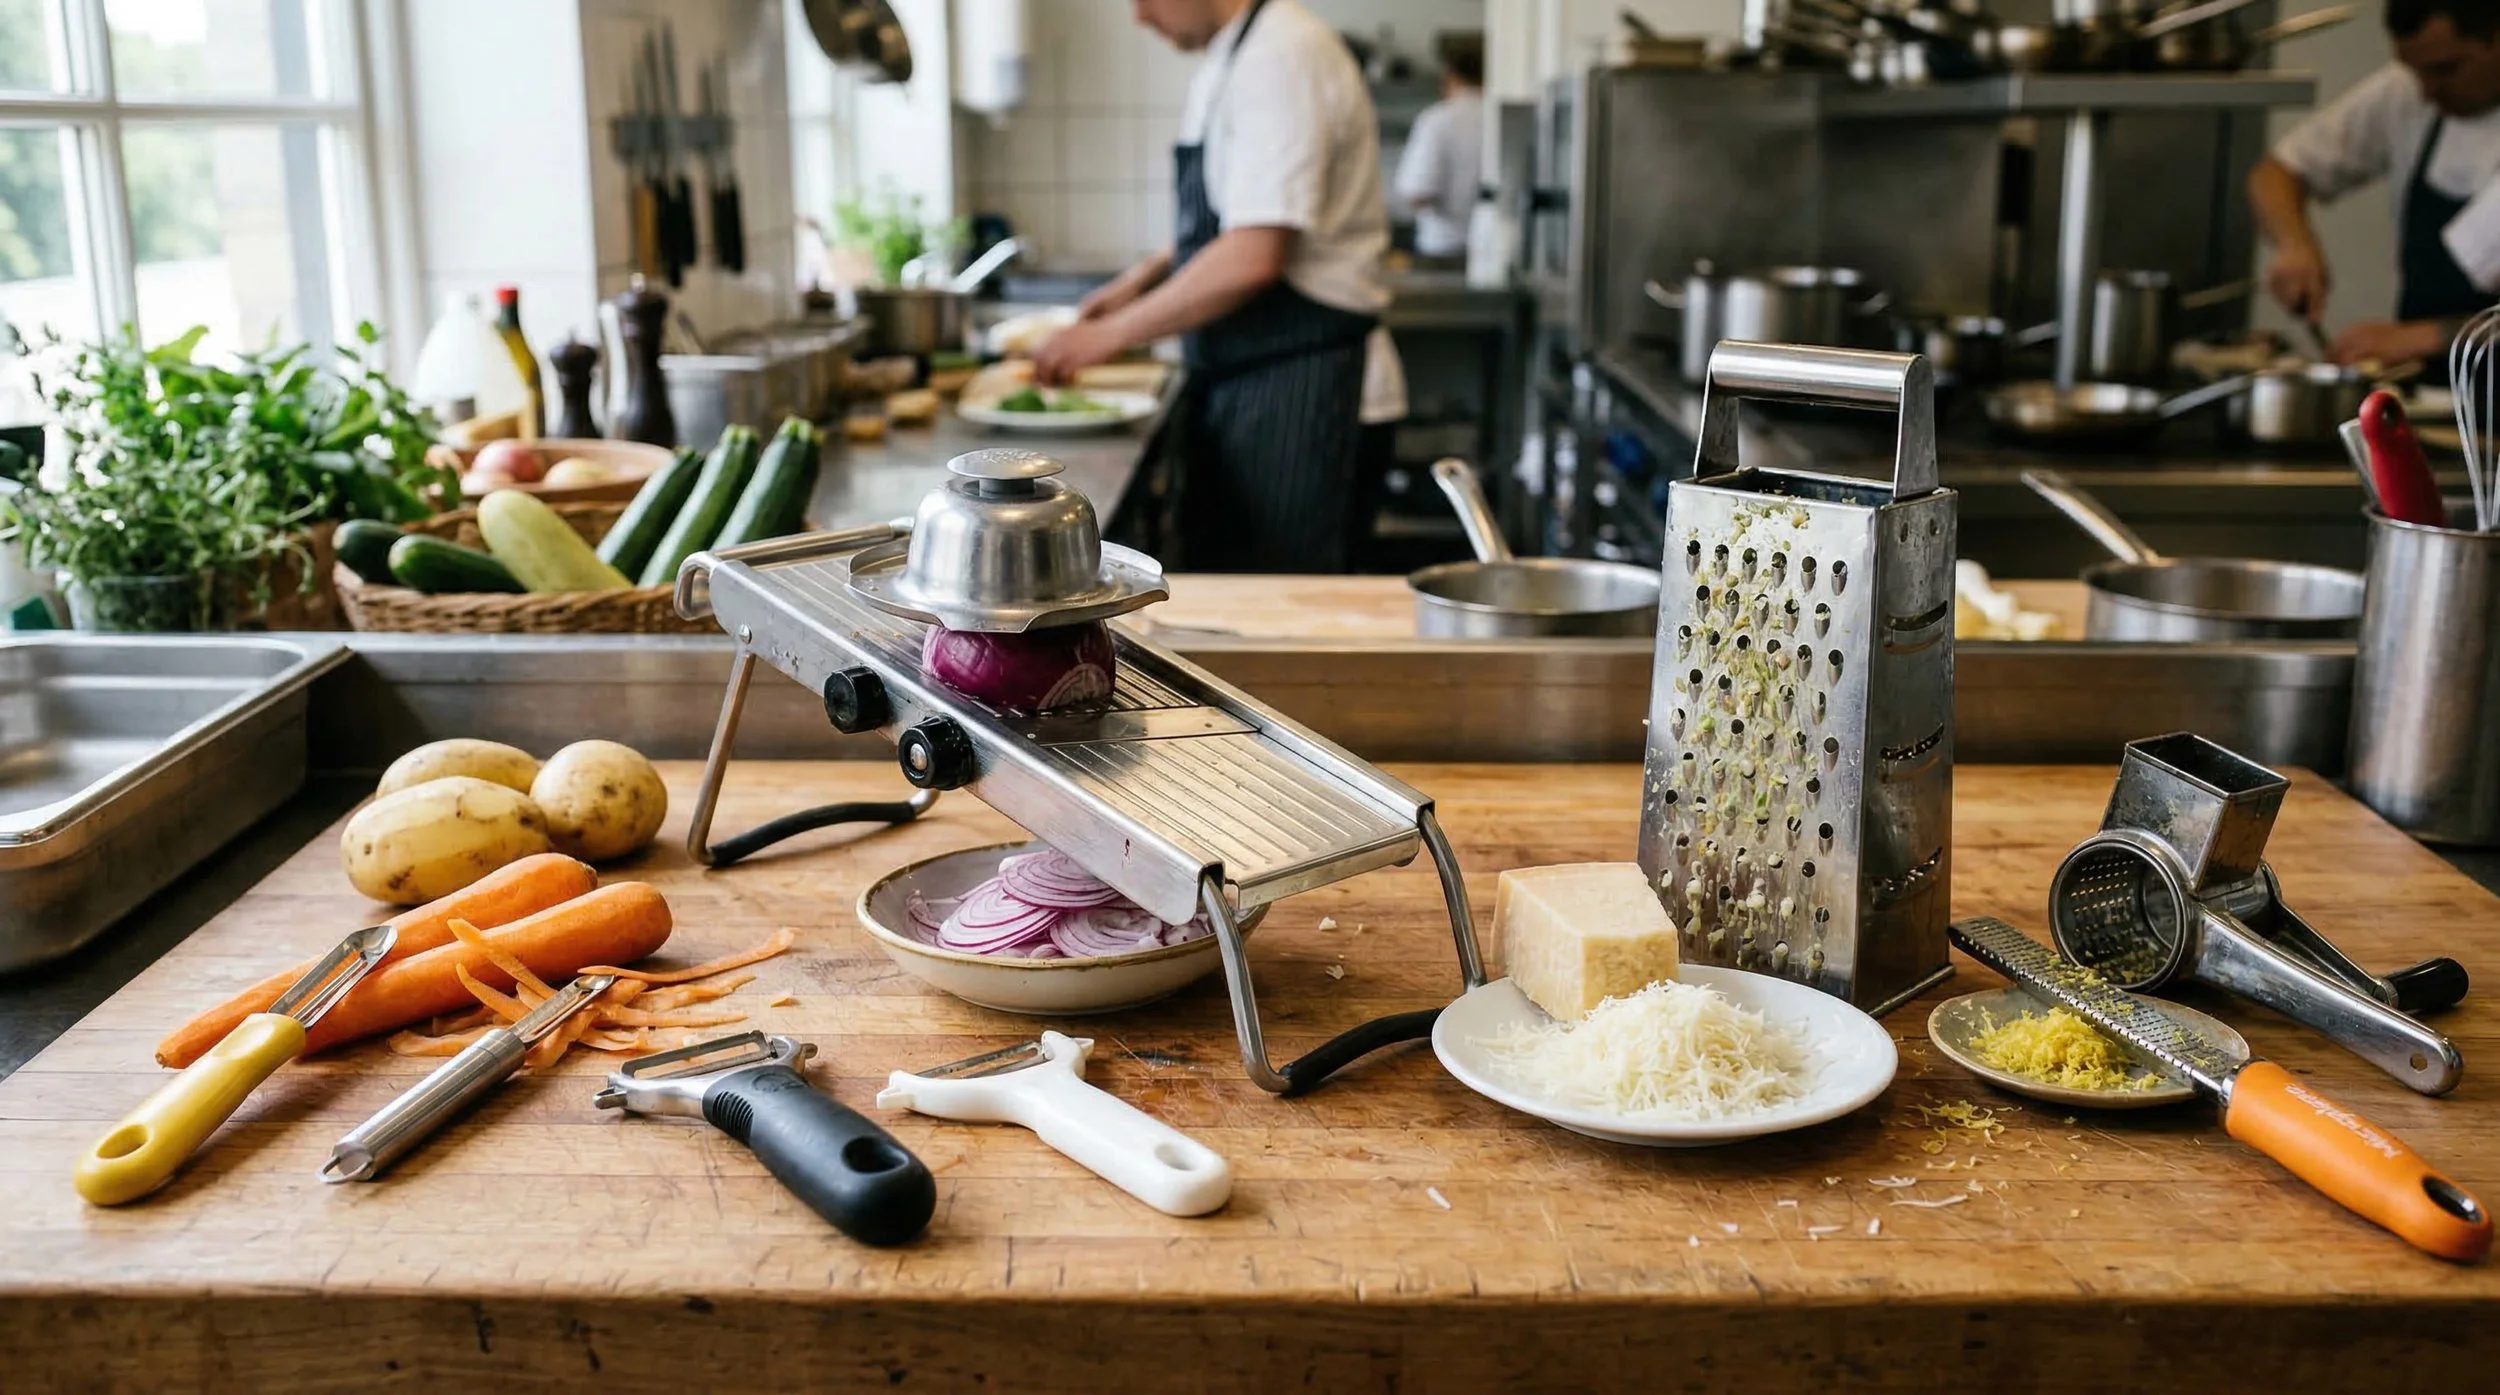
These three tools are some of the most useful and underrated in any kitchen. They won't win the glamour award like a beautiful chef's knife, but master them and your prep work becomes faster, more precise, and frankly more impressive. Here's everything you need to know.
The Mandoline
The mandoline is one of the most powerful prep tools in the kitchen — and one of the most feared. Used correctly, it produces perfectly uniform slices in seconds that would take minutes to achieve by hand. That consistency isn't just about presentation — even slices cook evenly, which matters enormously when you're making gratins, salads, or vegetable chips.
What it's used for: Thinly slicing cucumbers, fennel, courgettes, potatoes, beetroot, carrots, and onions. It's also excellent for creating julienne strips and waffle cuts on more advanced models.
Types of mandoline: A basic flat mandoline is all most home cooks need — a simple adjustable blade that lets you control the thickness of your slices. Professional or V-shaped mandolines offer more blade options and greater stability. Handheld mandolines are compact and affordable, though less stable.
Chef's tips: Always use the hand guard that comes with it — the mandoline is responsible for more kitchen injuries than almost any other tool. If you don't have a guard, use a cut-resistant glove. Keep your fingers curled away from the blade, work at a steady pace, and never rush. Stop when the piece of food gets too small to hold safely — those last few slices aren't worth your fingertips.
Peelers
The humble peeler is one of those tools every kitchen has but few people think about seriously. The right peeler makes a genuine difference — a good one glides effortlessly, a bad one drags and frustrates.
Types of peeler:
Straight or Y-peeler — The Y-peeler has a wide, horizontal blade and is favoured by many professional chefs for speed and control. It's particularly good for peeling large vegetables like butternut squash, sweet potatoes, and carrots quickly and efficiently.
Swivel peeler — The classic design most people grow up with. The blade pivots as it moves, following the contours of the vegetable. Great for general peeling of potatoes, apples, and parsnips.
Julienne peeler — Features a serrated or toothed blade that cuts thin strips rather than a clean peel. Perfect for creating julienne carrots or courgettes for salads, garnishes, or stir-fries without needing a mandoline or knife skills.
Serrated peeler — Designed specifically for soft-skinned fruits like tomatoes, peaches, and plums, where a standard peeler would drag and bruise the flesh.
Chef's tips: Always peel away from your body. Keep your peeler sharp — a worn blade requires more pressure and increases the risk of slipping. A good peeler should feel comfortable in your hand and require almost no effort to glide through skin.
Graters
The grater is one of the most versatile tools in the kitchen, yet most people only ever use one side of it. Understanding the different grating surfaces opens up a whole new world of texture and flavour in your cooking.
Types of grater:
Box grater — The classic four-sided grater is the most versatile option in any kitchen. Each side serves a different purpose — coarse grating for cheese and vegetables, medium grating for softer foods, fine grating for hard cheese and chocolate, and a slicing blade for thin cuts.
Microplane / Fine grater — Originally a woodworking tool, the microplane was adopted by chefs and has become indispensable. Its razor-sharp fine teeth produce ultra-fine, fluffy results perfect for zesting citrus, grating Parmesan, grating fresh nutmeg, mincing garlic, and grating fresh ginger. It's one of those tools that once you have it, you wonder how you ever cooked without it.
Coarse grater — Used for grating larger amounts of cheese, carrots, courgettes, or potatoes for rösti, hash browns, or salads.
Drum grater — A rotary grater with a handle that you turn like a drum. Excellent for grating large quantities of hard cheese like Parmesan or Pecorino quickly and cleanly at the table.
Chef's tips: Always grate downward with steady, even pressure. Use the full length of the grater rather than short, choppy strokes. For soft cheeses, pop them in the freezer for 15 minutes before grating — they'll hold their shape and grate far more cleanly. When using a microplane for citrus zest, only grate the coloured outer skin — the white pith underneath is bitter. And always watch your knuckles on the final strokes.
A Note on Maintenance
All three of these tools share one common enemy — dullness. A blunt mandoline blade, a worn peeler, and a clogged grater all make your work harder and less safe. Clean graters immediately after use before food dries and hardens in the teeth. Replace peelers when they start to drag rather than glide — they're inexpensive and worth refreshing regularly. Mandoline blades should be handled with extreme care when cleaning — always use a brush or cloth rather than running your fingers along the blade.
Great cooking isn't just about recipes and ingredients — it's about having the right tools and knowing how to use them. A mandoline, a good peeler, and a sharp microplane will quietly transform your kitchen prep every single day.