
PLATING AND PRESENTATION TOOLS
Plating & Presentation Tools — The Complete Guide
There is a moment in every meal before the first bite is taken — when the plate arrives and the eyes take in everything at once. That moment matters. Presentation is not vanity or pretension — it is the visual language of cooking, the way a dish communicates care, skill, and intention before a single flavour is tasted. The good news is that beautiful plating is not the exclusive territory of Michelin-starred restaurants. With the right tools, a few core principles, and a little practice, any cook can plate food that looks as good as it tastes. Here is everything you need to know.
Tweezers, Squeeze Bottles, and Plating Spoons
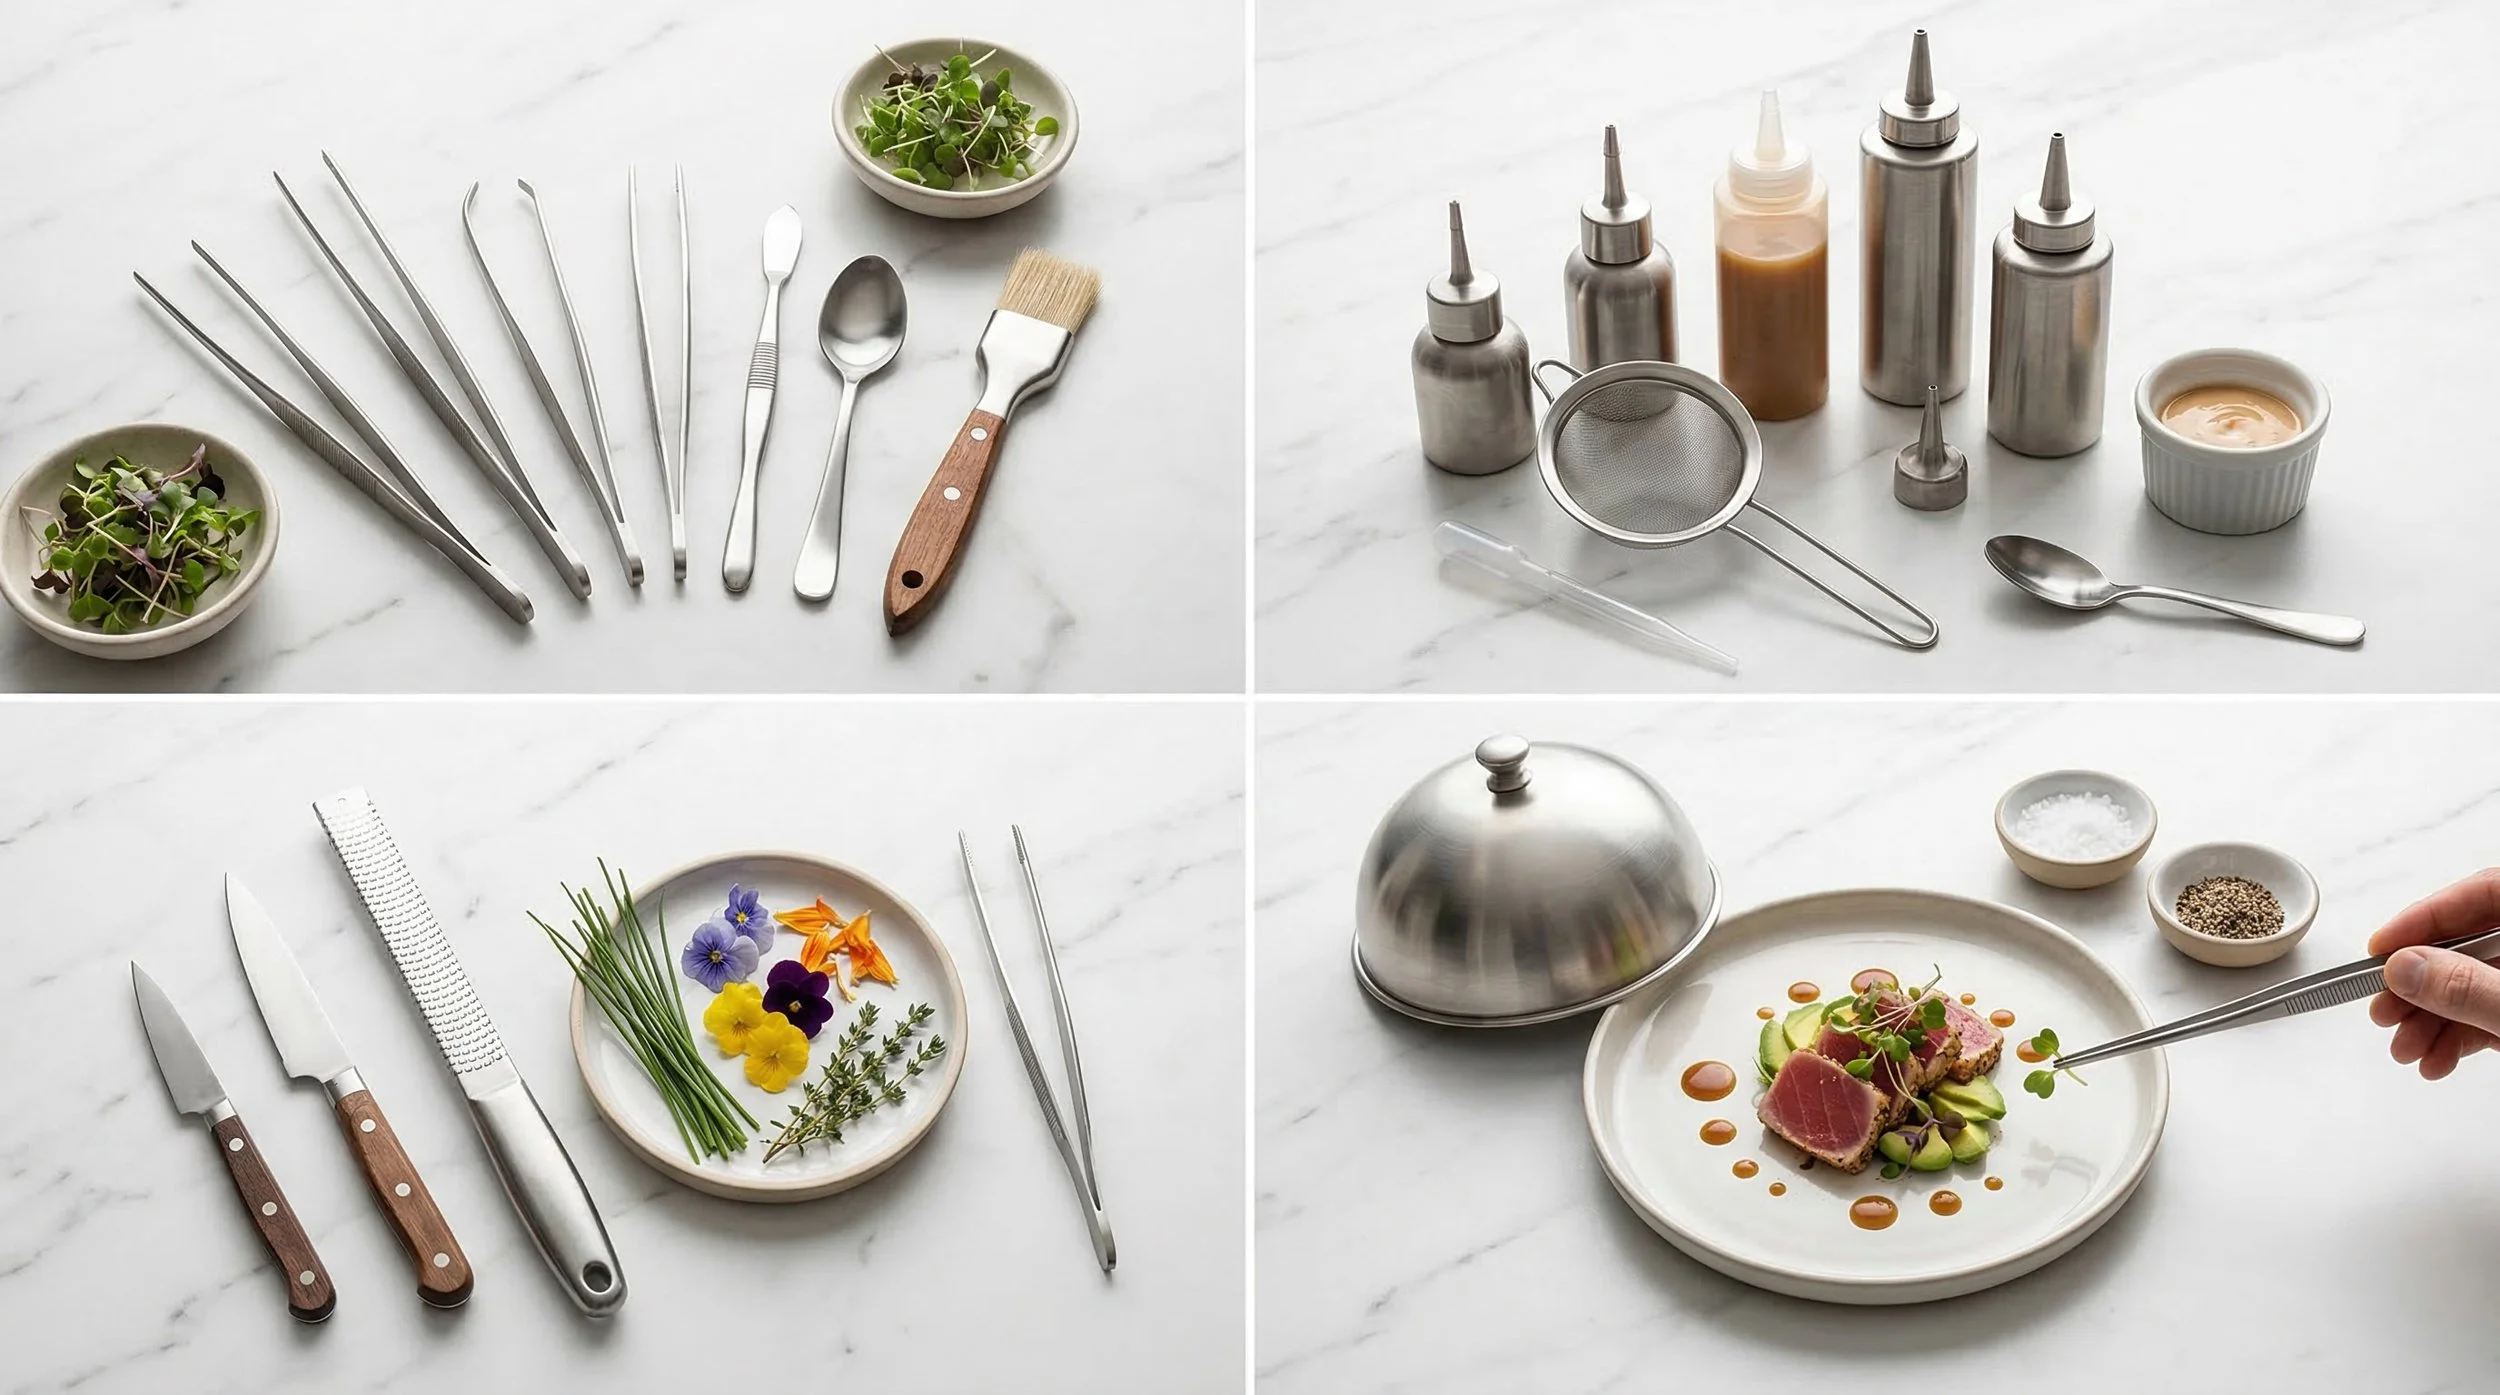
These three tools are the holy trinity of professional plating — the instruments that give chefs the precision, control, and speed to dress a plate exactly as intended, every single time, under the pressure of a busy service.
Plating Tweezers
Plating tweezers — also called chef's tweezers or precision tweezers — are the tool that most visibly distinguishes professional plating from home cooking. Long, slender, and precise, they are the extension of the chef's fingers onto the plate — allowing placement of garnishes, herbs, flowers, and delicate elements with an accuracy that fingers simply cannot achieve.
Types of plating tweezers: Straight tweezers are the most versatile — they handle the majority of plating tasks from placing micro herbs to positioning a single piece of pickled vegetable with millimetre precision. Angled or bent tweezers allow the chef to work at a comfortable angle without the hand obscuring the view of the plate. Spoon-tipped tweezers combine a small spoon bowl with the precision of tweezers — allowing the chef to scoop, transfer, and place small quantities of sauce, caviar, or delicate garnishes in a single movement.
What they're used for: Placing micro herbs, edible flowers, and sprouts precisely. Positioning individual elements of a composed dish. Lifting and repositioning delicate components without disturbing the rest of the plate. Removing any unwanted drips or misplaced elements before the plate leaves the pass.
At home: A good pair of plating tweezers is one of the most immediately impactful tools a home cook can add to their kitchen. The difference in precision between placing a herb garnish with tweezers and dropping it on with your fingers is immediately visible — and immediately impressive.
What to look for: Stainless steel construction, a comfortable length of around 20 to 25cm, and a grip tension that is firm enough to hold delicate items without requiring excessive hand pressure. Always clean and dry tweezers immediately after use — the fine tips are prone to staining and corrosion if left wet.
Squeeze Bottles
The squeeze bottle is the sauce chef's most essential tool — a simple, inexpensive, and enormously versatile piece of equipment that gives complete control over where sauce goes, how much is applied, and in what pattern. In a professional kitchen, squeeze bottles are used for everything from the broad base sauce beneath a main course to the fine dots of reduced jus that punctuate a modernist plate.
Types of squeeze bottle: Standard squeeze bottles with a pointed nozzle are the most common — they produce a controlled, even flow of sauce ideal for broad strokes, puddles, and dragged sauce work. Fine-tip nozzles produce a thinner, more precise line — used for dots, fine lines, and detailed sauce work. Some professional plating sets include multiple nozzles of different gauges that fit the same bottle body, allowing the chef to switch between broad and fine application without changing bottles.
Sauce consistency matters: The viscosity of the sauce must be matched to the nozzle size. A thick, reduced sauce needs a wider nozzle — it will block a fine tip. A thin sauce or oil needs a finer tip — a wide nozzle will produce an uncontrolled flood rather than a precise application.
Techniques with a squeeze bottle: The puddle and drag — apply a puddle of sauce and drag through it with the back of a spoon to create an elongated stroke. The dot — a single, precise drop of sauce applied with a controlled squeeze. The line — a continuous fine line drawn across the plate. The swipe — a broad arc of sauce applied in a single sweeping motion. Each technique creates a fundamentally different visual effect on the plate.
Practical tip: Always fill squeeze bottles just before service and store them in a bain-marie of warm water to keep sauces at the correct temperature and consistency during a long service. Label each bottle clearly — in a busy kitchen, a mislabelled bottle of sauce is a plating disaster waiting to happen.
Plating Spoons
The plating spoon is the chef's most versatile plating instrument — used for smearing, swooshing, placing, and finishing sauces and purées on the plate in ways that a squeeze bottle or ladle cannot achieve. A good plating spoon feels like a natural extension of the hand — responsive, weighted, and precise.
Types of plating spoon: The classic oval plating spoon is the standard — a medium-sized, deep bowl with a long handle, used for applying and shaping sauces, placing garnishes, and basting components on the plate. The quenelle spoon — typically two spoons of the same size used together — is used to shape soft, mousse-like preparations into the elegant three-sided oval called a quenelle. The offset plating spoon has a curved neck that holds the bowl at an angle to the handle — making it easier to work on a flat plate without the hand getting in the way.
The swoosh: The most iconic plating technique using a spoon — place a generous spoonful of purée or thick sauce on the plate, then draw the back of the spoon through it in a single, confident arc. The result is a swept stroke of sauce that frames the main component beautifully. The key is commitment — a hesitant, slow swoosh produces a smeared mess, while a confident, decisive arc produces an elegant result.
Moulds, Rings, and Shapers
Where tweezers, squeeze bottles, and spoons control the liquid and delicate elements of a plate, moulds, rings, and shapers control the structure — giving solid components a defined, professional shape that elevates the visual impact of the dish immediately.
Plating Rings
The plating ring — a simple cylinder of stainless steel without a base — is one of the most widely used and versatile tools in professional plating. Place the ring on the plate, fill it with a prepared component, press it gently to compact, and lift the ring cleanly away — leaving a perfectly cylindrical tower of food standing on the plate. It is the technique behind the stacked presentations that defined modern bistro cooking in the 1990s and remains a clean, effective way to give structure and height to a plate.
Sizes and shapes: Round rings are the most common and come in a range of diameters — from small rings for individual amuse-bouche portions to large rings for main-course presentations. Square and rectangular rings produce a cleaner, more architectural effect and work particularly well with terrine-style presentations and pressed salads. Rings with tapered sides — wider at the base, narrower at the top — create a naturally elegant tower shape that releases cleanly.
What they're used for: Shaping risotto, rice, couscous, and grain salads. Building layered presentations of tartare, ceviche, and pressed salads. Forming individual portions of mashed potato, cauliflower purée, and similar soft preparations. Moulding terrines and pressed preparations for slicing.
Technique for clean release: Lightly oil the inside of the ring before filling. Press the contents down firmly and evenly with the back of a spoon to eliminate air pockets. Hold the ring firmly against the plate and lift cleanly and directly upward in a single smooth movement — any wobble or dragging will damage the sides of the tower.
Silicone Moulds
Silicone moulds bring an entirely different dimension to plating — one of shape, geometry, and defined form that stainless steel rings cannot achieve. Available in an almost unlimited range of shapes — spheres, half-spheres, quenelles, cubes, teardrops, flowers, and more — silicone moulds allow the chef to set, freeze, or bake preparations in precise, reproducible geometric forms that would be impossible to achieve by hand.
What they're used for: Setting panna cotta, parfait, mousse, and jelly in precise shapes. Freezing components for composed desserts that are plated from frozen and allowed to thaw on the plate. Baking individual financiers, madeleines, and petit fours in perfect, uniform shapes. Forming butter and chocolate decorations. Creating ice spheres and decorative ice elements for cocktails and dessert plates.
The frozen component technique: One of the most elegant applications of silicone moulds in professional plating is the frozen component — a preparation set in a mould, frozen solid, unmoulded, and placed on the plate to thaw slowly during service. The component arrives on the plate with perfect, pristine edges that would be impossible to achieve by plating at room temperature. Chocolate mousse domes, parfait cylinders, and fruit jellies are all commonly executed this way.
Terrine Moulds
The terrine mould is a rectangular or oval vessel — typically made from cast iron, enamelled cast iron, or stainless steel — used to set pressed preparations of meat, fish, vegetable, or foie gras into a firm, sliceable loaf. Each slice of a well-made terrine is a cross-section of layered ingredients — as much a visual as a gastronomic achievement.
Lining and pressing: Terrines are typically lined with cling film, blanched vegetables, or thin slices of meat before filling — which both facilitates unmoulding and creates the attractive outer layer visible when sliced. Once filled, the terrine is weighted during setting — either in the refrigerator or after baking — to compact the layers and eliminate air pockets that would cause the terrine to crumble when sliced.
Dome Shapers and Quenelle Tools
The dome shaper — a small, rounded tool used to form a neat hemisphere of soft food — and the quenelle spoon together represent the toolkit of classical French presentation. The quenelle — that elegant three-sided oval of mousse, ice cream, or soft preparation shaped between two spoons — is one of the most iconic techniques in classical plating. It takes practice to master but produces a result of effortless elegance that immediately elevates any plate.
Tools Used in Professional Plating
Beyond the primary plating tools, the professional kitchen uses a range of specialist equipment during plating and service that contributes to the precision, consistency, and speed of the finished plate.
The Pass and Heat Lamp
The pass — the counter between the kitchen and the dining room where finished plates are assembled and checked before service — is the nerve centre of plating in a professional kitchen. A heat lamp above the pass keeps finished plates warm while they are being dressed and checked — maintaining the temperature of the food without continuing to cook it. Speed at the pass is essential — every second a plate sits under a lamp is a second the food is overcooking and the presentation is deteriorating.
Microplane and Fine Grater
At the plating stage, a microplane produces ultra-fine shavings of hard cheese, chocolate, citrus zest, fresh truffle, and dried spices that settle onto a plate like snow — adding flavour, aroma, and visual texture simultaneously. The feather-light quality of microplane-grated ingredients is impossible to achieve by any other method and adds an immediate sense of refinement to a finished plate.
Blowtorch
The kitchen blowtorch — or culinary torch — gives the chef direct, localised heat at the plating stage for techniques that require targeted browning, caramelisation, or melting. Caramelising the sugar on a crème brûlée, finishing a meringue, melting cheese on a gratin portion, searing the surface of a salmon portion placed on a cold component — all are executed with the blowtorch during plating or immediately before. A good kitchen torch has a stable base, a continuous-flame lock for longer tasks, and a fine, controllable nozzle.
Acetate Sheets and Rulers
For modernist and pastry plating, acetate sheets are used as templates — placed on the plate and dusted with powder, cocoa, or icing sugar before being lifted to leave a precise, clean-edged geometric pattern. A small ruler ensures consistent spacing between elements on a composed plate. These tools reflect the architectural precision that defines high-end pastry presentation.
Warm Plates
The most overlooked element of professional plating is also the simplest — warm plates. Food plated onto a cold plate begins to lose temperature immediately, and fine oil-based sauces begin to set and lose their gloss. In a professional kitchen, plates are warmed in a dedicated plate warmer or low oven before service — typically to around 60°C — ensuring food arrives at the table at the correct temperature with all its visual properties intact. This is the single easiest professional habit any home cook can adopt immediately.
Building Confidence with Presentation at Home
The gap between restaurant plating and home plating is smaller than most people think — and it closes rapidly with a few tools, a handful of principles, and a willingness to treat the plate as a canvas. Here is how to build your confidence and skill in presentation at home.
Start with a Clean Plate
The single most impactful thing you can do immediately is to treat the rim of the plate as a frame — keep it spotlessly clean. Sauce drips and smears on the rim of a plate make even beautifully cooked food look careless. In a professional kitchen, every plate is wiped with a clean, damp cloth before it leaves the pass. At home, keep a clean damp cloth beside you during plating and wipe the rim of every plate before it goes to the table. The effect is immediate and significant.
Choose the Right Plate
The plate is the canvas and it matters. A white plate is the default of professional plating for good reason — it provides a neutral background that allows the colours of the food to speak clearly. An oversized plate with a wide rim gives the food room to breathe and makes portions look considered and deliberate rather than piled and rushed. Avoid plates with strong patterns or colours that compete visually with the food.
Think in Odd Numbers
One of the most instinctive principles of food presentation — place elements in odd numbers wherever possible. Three scallops. Five asparagus spears. Seven dots of sauce. Odd numbers create visual dynamism and a sense of natural arrangement that even numbers — which tend to look symmetrical and static — do not. This is not a rigid rule, but it is a reliable guide that produces better results more consistently than even groupings.
Build Height Thoughtfully
Height on a plate creates visual interest and a sense of generosity — but it must be deliberate and stable. A tower of food built without thought looks precarious and collapses before it reaches the table. Build height with purpose — use a plating ring to form a structured base, layer components with contrasting textures, and place the most visually interesting element at the highest point. Keep the height proportional to the plate — a towering construction on a small plate looks absurd.
Use Colour Deliberately
Colour is one of the most powerful tools in plating — and it is determined long before the plate is assembled, in the cooking and preparation of the components. A plate that features only brown and beige — however well cooked — looks uninviting. Build colour into your dishes through fresh herbs, vibrant sauces, pickled vegetables, citrus zest, edible flowers, and carefully cooked green vegetables that retain their colour.
The classic rule of thumb is to ensure every plate has at least three distinct colours — and that one of them is green. A fresh herb garnish, a spoonful of salsa verde, a scattering of pea shoots, or a few leaves of watercress costs almost nothing and transforms the visual impact of a plate instantly.
The Garnish Must Earn Its Place
A garnish should never be purely decorative — it should add flavour, texture, or aroma to the dish as well as visual appeal. A sprig of fresh thyme placed on a roasted chicken thigh tells you something about how the dish was cooked. A few drops of good olive oil on a soup add richness and sheen. Micro herbs on a tartare add freshness and a second texture. A garnish that contributes nothing but colour is a lazy garnish — and an experienced eye always notices.
Practice the Swoosh
The sauce swoosh is the single technique that most immediately transforms home plating from domestic to professional. Mix a thick purée or sauce to the right consistency — it should flow slowly from a spoon but hold its shape once placed. Add a generous spoonful to the plate. Place the back of the spoon at the near edge of the sauce and sweep it away from you in a single, confident arc. The result is an elegant, swept stroke that frames the main component perfectly. Practise it on a spare plate before service until the movement feels natural — it takes less than five attempts to master.
Less Is More
The most consistent mistake in home plating is overcrowding. A plate with too many elements, too much sauce, and too little white space looks busy, confused, and unsophisticated — regardless of how good the individual components taste. Restraint is the hallmark of confident plating. Give each element room to be seen. Let the white space of the plate work for you. A simple plate plated with intention and care almost always looks better than a complex plate crammed with competing elements.
Plating is the final act of cooking — the moment you communicate everything you have put into a dish to the person about to eat it. It doesn't require expensive tools or years of training to do it well. It requires attention, care, and the understanding that how food looks is part of how it tastes. Start with clean plates, a squeeze bottle, and a pair of tweezers — and go from there.